viewneo Butler User Manual
Need to change languages? Sprache ändern?
Important! To set up the device you need a computer (notebook) with WiFi or a smartphone. We recommend completing the setup process using a smartphone.
To set up the device you'll need:
- An Internet connection
- A computer with WiFi (notebook) or a smartphone
- Optional: Ethernet cable
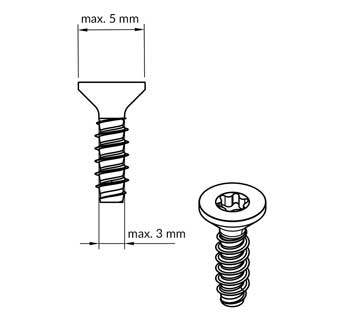
- Optional for wall mounting: 2 countersunk screws 2.5 - 3 mm (max. 5 mm head), 2 screw plugs depending on wall condition and screws
- Optional for wall mounting: drill or screwdriver
- A valid viewneo user account
1. Preparing the device
Package contents
The box contains the following individual parts:
| Quantity | Description |
|---|---|
| 1 x | Quickstart Guide |
| 1 x | viewneo Butler |
| 2 x | Antennas |
| 1 x | Power Supply |
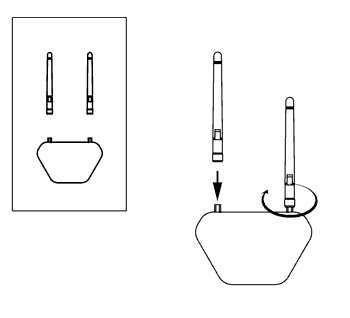
Screw on the antennas
The external antennas need to be screwed into the device.
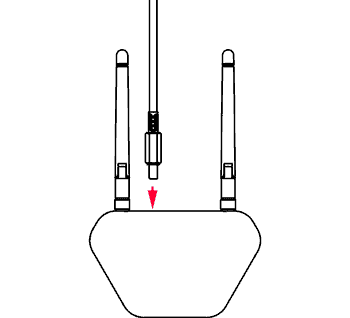
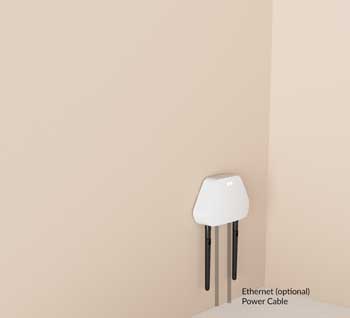
Wiring and connecting the device
Connect the network cable to the connector located on the back of the device.
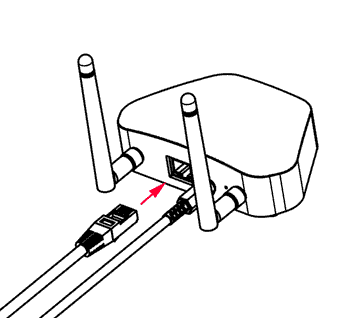
When using a LAN cable / Ethernet cable
If the viewneo Butler is connected to the Internet with an Ethernet cable, then a LAN cable must also be plugged into the socket located on the rear of the unit.
Mounting options
The Butler can be used as a tabletop unit or mounted onto a wall.
Wall mounting
To mount the Butler onto the wall there are screw head inserts located on the bottom of the device. These inserts are arranged, so that the Butler when mounted will have the antennas and cables facing downwards. There is also the option of mounting the Butler, so that both the antennas and the cables face upwards.
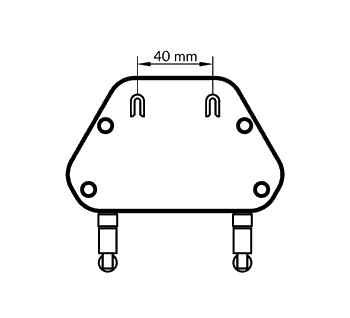
The screws are not included!. Depending on the wall, there are different screws which may be needed for mounting. Please ask your specialist dealer for advice.
Countersunk screws with a shank diameter of no more than 3 mm and a head diameter of no more than 5 mm are used.
2. Link to a personal viewneo user account
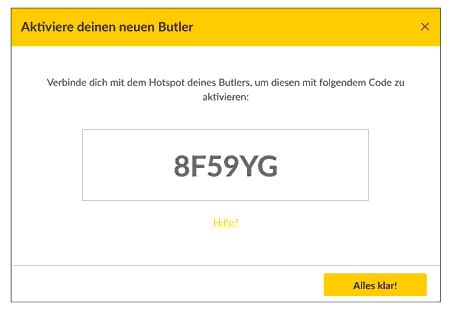
During the initial setup of the Butler (under point 3) you will be asked to enter an activation key. This key is available in the viewneo Content Management System.
Obtaining an activation key for the Butler in CMS
Register in the viewneo CMS at https://cloud.viewneo.com.
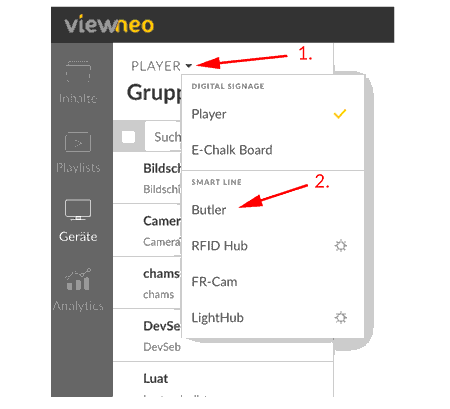
Go to devices in the main navigation and then select the device type: Butler:
Click on the plus sign to add a new Butler in the CMS.
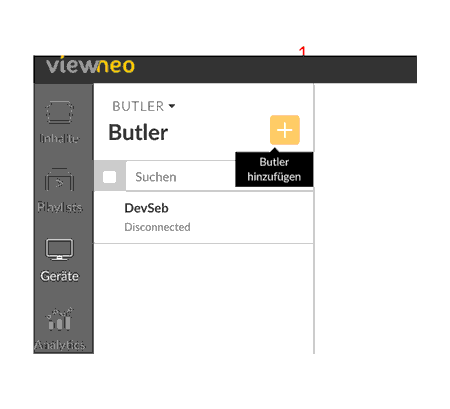
You now have the ability to name the Butler, so that you can identify it easier later in the CMS.
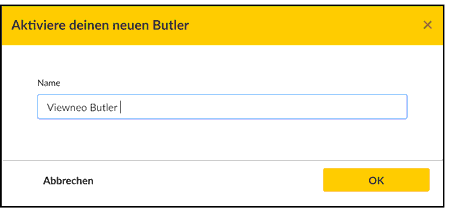
Important: Please note, you will receive an activation key, which should be recorded to complete the next step of the installation process.
3. Butler Setup
The Butler will start once it has been wired and the power supply unit has been supplied with power. It will take a few minutes for the Butler to complete the startup process.
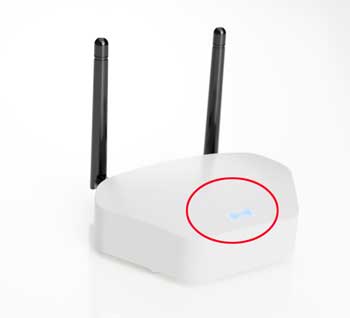
When the Butler is ready for the next step, there will an indication from the LED located at the top of the unit. The LED is located inside the case and shines through the case in the shape of a bowtie.

As soon as the "bowtie" of the Butler pulsates in the color blue, you can continue with the next step.
Setting up the network connection
For this step you need either a smartphone, PC, or notebook with WiFi.
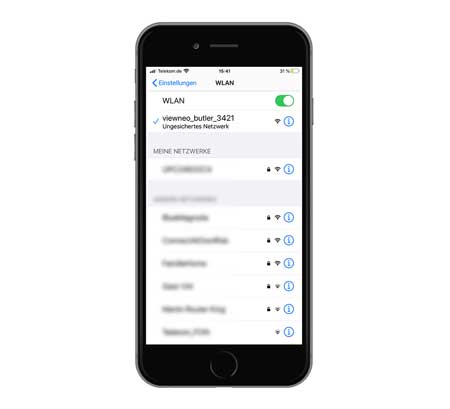
Connect to the hotspot of the Butler
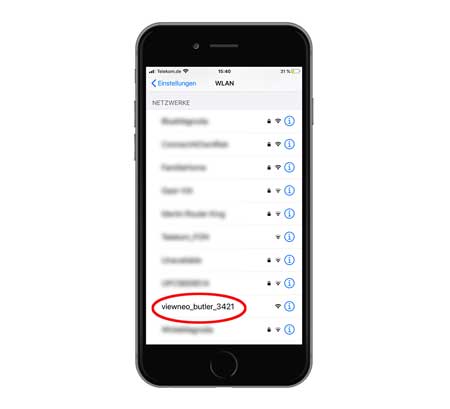
Connect to the hotspot of the Butler.
The network name (SSID) is viewneo_butler_xxxx
When you have successfully connected to the Butler WiFi hotspot, you will receive a confirmation as shown below. Open an internet browser on your PC/Smartphone.
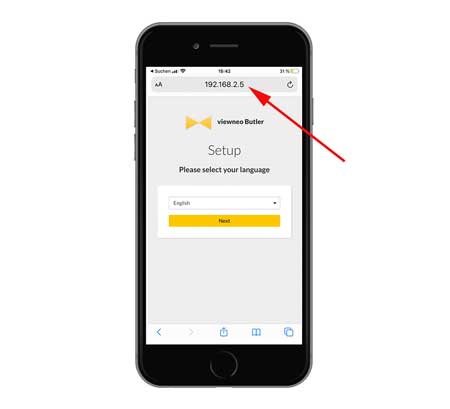
In the internet browser (Safari, Google Chrome, Firefox, IE etc.) the following IP address must be entered in the address bar of the browser to activate the Butler setup wizard.
Call the IP address in the browser: http://192.168.2.5.
Now you should see the following picture:
After selecting the language you will be asked to enter the activation key, you received in step 2. (siehe Punkt 2).

As soon as the key has been entered, the following message will be displayed on the status LED of the Butler:
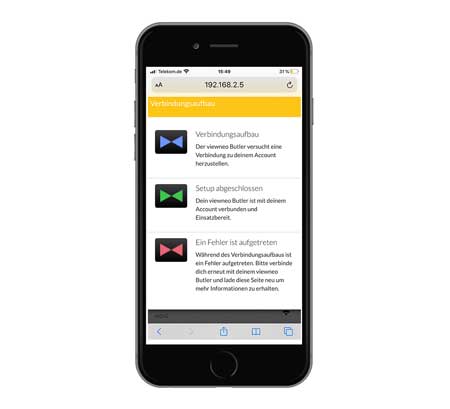
If the Butler is successfully connected to the viewneo user account, the colour of the status LED changes to green (permanent).